Cordless Soldering Irons
Gas characteristics produce strong gas discharge power when hot and, conversely, weak discharge power when cold. In addition, regardless of the frequency of use, degradation over time of the valve that controls gas discharge (flame orifice valve inside the body) will result in fluctuations in the gas discharge volume.
While a single defect may be the cause, compound causes may be involved, but the most common cause is excessively high gas discharge volume. In addition, depending on the model, the user may be able to adjust the gas discharge volume. The method of making adjustments to Kotelyzer 90 Auto is described below. For adjustments to other models, please contact the service center.
While the ejector unit and iron tip can be replaced by the user, please request replacement of the flame orifice valve and piezo-electric unit with the distributor or the service center. (Dismantling the body is prohibited.)
Before storing the product after use, make sure that the gas is switched OFF and gas discharge is shut off and set the gas control to maximum (5 or +, depending on the model).
A sponge is used in the control valve (flame orifice valve) in the body to adjust the gas volume. Storing the product with control set to minimum (1 or -, depending on the model) will result in the sponge being crushed during the period of storage, inhibiting its restoration.
*Since ON/OF and gas control operation are interlocked in Kotelyzer 71, always set to the OFF position during storage.
Points to be checked if the product fails to ignite are set out below, taking Kotelyzer 90 Auto as the example.
Please read before use.
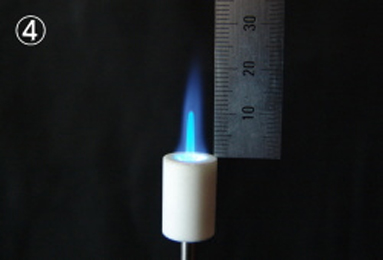
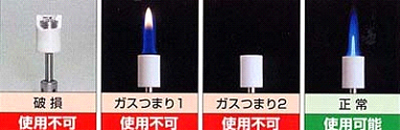
When checking the gas discharge volume, also check the shape of the flame emitted by the ejector unit.
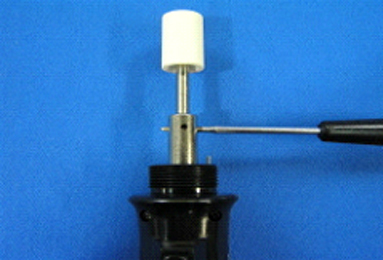
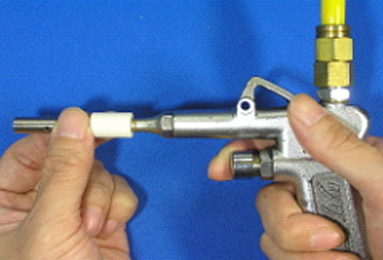
When glass blockage 1 or 2 occurs, before replacing the ejector unit, insert the ejector spanner provided as an accessory to the body or a metal rod into the hole at the side and turn counterclockwise to remove the ejector unit. Use an air gun to blow air through the ejector unit from the top and bottom. If this removes the blockage, the ejector unit can be used as it is.
As the piezo-electric element is used, voltage will drop and ignition performance deteriorate.
Continually depressing the button because the unit will not ignite will accelerate piezo-electric expiry.
Expiry of the iron tip life may also cause failure to ignite.
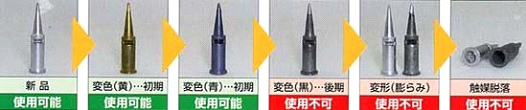
Increasing the temperature more than necessary will result in deformation of the iron tip and accelerate expiry of the catalyst.
In addition, the unit should be used with the control lever set to a temperature suitable for work, otherwise problems such as ejector or gas blockage may occur.
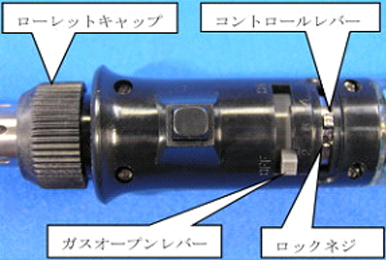
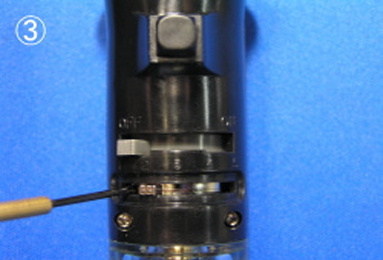
Adjusting the Kotelyzer 90 Auto (90 Auto II) Gas Discharge Volume
Gas discharge adjustment is performed to make adjustments to the discharge volume if it fluctuates due, for example, to valve degradation or sever changes in temperature (summer, winter).